Back to Asset Essentials Main Menu
Asset Essentials provides you with a hierarchy of fields, including Regions, Sites, and Locations, to define your organizational structure. You may or may not use all fields in your account. Your organizational structure identifies where work is performed, as well as where Assets and Parts are housed. Locations are places within Sites. If a Site is a "home" then a typical location in that home might be "kitchen" or "bedroom." How you define a Site will help determine how you define a Location. For example, a Site may be a plant in a specific city and a location within that site may be specific building or plant at that site. Locations can have many identifying characteristics. In addition to room name, number and a cost center, a Location is part of a Site. It may also be located on a floor, have a description, and could have a latitude and longitude associated with it (particularly if it is located outdoors). Assets and Parts are housed within a Location.

How to add locations
Watch the video tutorial:
- Click on the Assets menu icon, then click Locations.
- Select the Site where you will be adding the Location from the Site drop down menu.
- Click the New button.
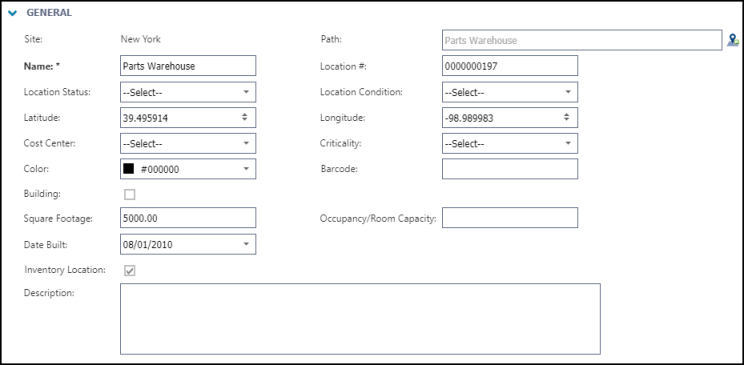
General
- Enter the Name of the Location.
- If the Location is found under another already defined Location, you can use the Path field to place the Location in the correct spot in your hierarchy of Locations. For example, If you are adding a Location called "Boiler Room," at the "Building A" Location, the Path would be "Building A \ Boiler Room." To enter a Path, click the Select Locations icon (
) and choose where your Location resides by clicking the plus sign icon (
).
- If this location is going to be used for storing your parts, check the box next to Inventory Location. This will allow you to add this location to a part.
- If you plan to print barcode labels for your Locations, enter a Barcode number. This is also where you would enter a non-Asset Essentials QR code value for the Location, if you are using them.
- The rest of the fields in the General section are optional, however it is recommended to provide as much detail as possible.
Addresses
- In the Addresses section, you can give the Location an address, if appropriate. This is useful if you use the Map View feature of Asset Essentials.

Assigned To / Responsible Users
- Use this section to indicate who is responsible for the Location.
- Click the Select User or Select Me icons at the top to either select yourself or another user whose information is already populated in Asset Essentials. This will automatically assign a work order at this location to the selected users if the Work Order template has been set up to assign from the Source Asset/Location/Site. *Note: Automatic assignment is only available to clients who have purchased Asset Essentials Enterprise.

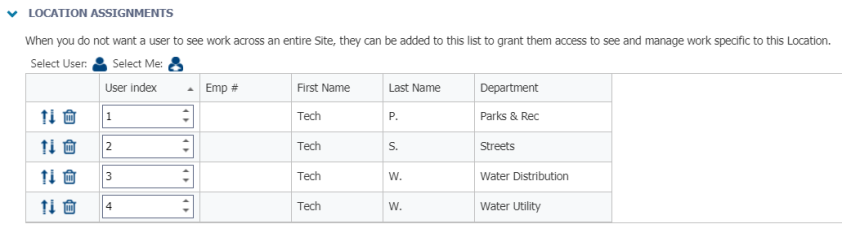
Location Assignments
- When you do not want a Technician to see work across an entire Site, they can be added to a Location Assignment list to allow them to see and manage work for a specific Location(s). *Note: You can only assign a user to a top level location.
- To assign user(s) to a location, click the Select User icon.
- Check the box next to the appropriate user(s).
- Click Select.
Documents
- Use this section to attach documents related to your Location. Click on the Select Document icon to either select a document from the Documents Library, or add a document from your computer.
- Click Save at the top of the screen.
